How to Manually Upgrade/Unroot/Unbrick Samsung Galaxy Note II GT-N7100
For those of you who have bricked your Galaxy Note II (perhaps ended up in a bootloop), want to return to stock firmware (because you forgot to make a backup ROM!), or you want to return your Note II back to Samsung Service center for warranty, here’s how to unroot/unbrick your Galaxy Note II with stock firmware.
Also, you can use this method to update your stock ROM to the latest stock firmware. For example, if Android 4.2 comes out, you can use this method to update instead of Kies if you want.
You can watch the following video on how to unbrick your Galaxy Note II, or skip it to reading the full step-by-step tutorial.
First, if you are rooted, it is HIGHLY advisable that you make a backup ROM of your device. And after making backup ROM, do make a backup of your internal storage by copying everything to your hard disk. If something goes wrong, you will be able to do a factory reset in stock Android recovery and get all of your settings, apps, photos, and videos back.
Also, if you are on a custom ROM like CM10, AOKP, or any ROM that is non-Samsung, non-TouchWiz, you will definitely need to do a factory reset. You can also do a factory reset in CWM Recovery BEFORE unrooting, that will not erase the contents of your internal storage (then you can skip the backups).
This method is using Odin and Windows computer. If you have Linux or Mac computer, you can also use 'Mobile Odin Pro' (which can be found on Google Play Store) to do the same thing.
So, let the games begin!
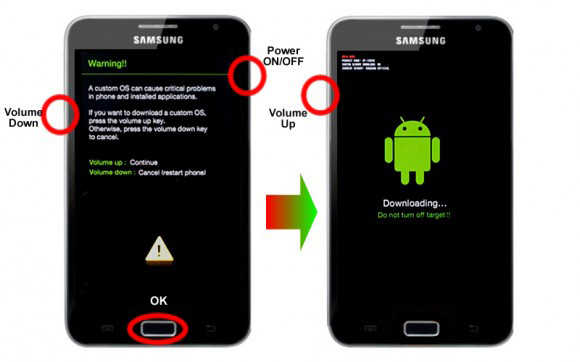
- Turn your Note II off, then hold down 'Volume Down', 'Home' and 'Power' buttons simultaneously to enter Odin Download Mode warning screen.
-
Hit 'Volume Up' to enter 'Download Mode' and connect a microUSB cable from your Galaxy Note II to your Windows Workstation.
- Go to either www.samsung-updates.com or www.samfirmware.com and download a compatible stock firmware for your Galaxy Note II. For example, if you have the international Galaxy Note II, search for model GT-N7100 and download the appropriate firmware for your country. If your country firmware does not exist you can use one that’s close to it, these firmwares will work on all GT-N7100.
- Unzip/extract the stock firmware zip file, you will find a file ending in 'tar.md5', that’s the stock firmware file.
-
Download Odin v3.07, then unzip and run Odin3 v3.07.exe. You should see a blue highlighted box with a random COM number with a message "Added" in the message box. You might also want to install Samsung USB Drivers if your workstation doesn't recognize the Galaxy Note II device. If your phablet needs a re-partitioning, then you'll need to download a compatible PIT file from here.
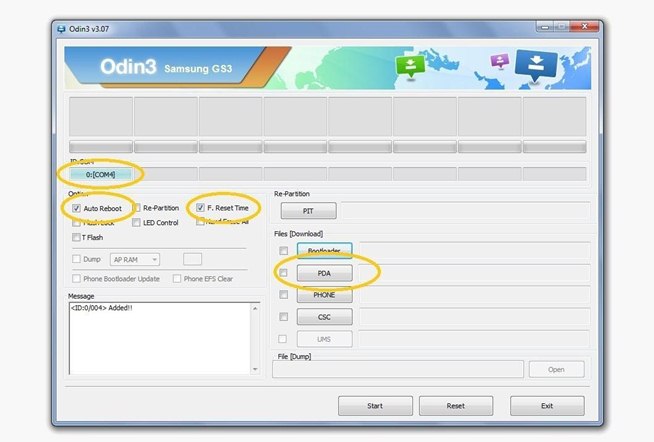
- Choose the PDA checkbox and point Odin to the '.tar.md5' firmware file you downloaded. Optionally, you can click the PIT button and choose the '.pit' file you downloaded previously.
- Enable 'Auto Reboot' and 'F. Reset Time' options by selecting their checkboxes. But, the 'Re-Partition' checkbox must be selected, only if a .pit file was chosen in the previous step.
- Make sure everything suggested in Step 6 and Step 7 is done correctly. Then hit the START button to begin the flashing process. This should take around 5-10 minutes. If it stalls for some reason, you can always re-start your Note 2 into Odin Download mode and try again. Also, if it stalls in the beginning, try another USB hub, that usually fixes those. Also, if you get “Kies Firmware Error”, you can re-try it too, that’s same as ODIN Download mode, no need to panic.
-
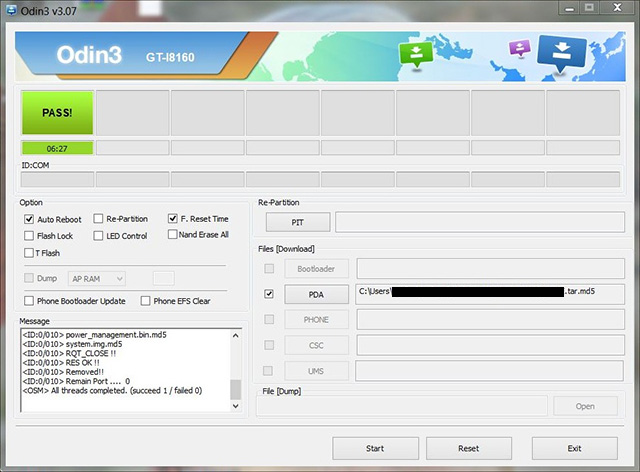
Once the firmware installation is done, your phone will reboot automatically and soon a PASS message with green background appears in the extreme left box at the very top of Odin. You can now safely remove the USB cable to disconnect your device from computer.
- If your phone boots into stock firmware, you are all good to go. If it doesn’t boot up after 10 minutes OR you get a lot of force closes, you can do a factory reset in stock recovery. Otherwise, STOP HERE.
- To do a factory reset, turn off your phone. Then hold down 'Volume Up', 'Home', and 'Power' buttons simultaneously. When you see the Galaxy Note II boot logo, keep holding down 'Volume Up' and 'Home' buttons and release the 'Power' button.
- Choose 'Wipe Data/Factory Reset'. WARNING: DOING THIS WILL ERASE EVERYTHING ON YOUR INTERNAL STORAGE!
After that, your Galaxy Note II should reboot just like the first day you got it.